


 English
 عربى
عربىNews

How to Wash Water Bottle Plastic with Straw and Lid
Pull the straw out of a bottle that's been sitting in a gym bag for three days, and the smell hits before anything else does. That sour, slightly musty odor isn't really about the water gone stale — it's about what's been growing quietly inside a straw and lid that never got taken apart and dried properly.
Why a Straw Lid Hides More Than It Shows
A plain water bottle with a screw-on cap is fairly forgiving. A sponge reaches most surfaces, water drains out easily, and there aren't many places for anything to hide. A straw lid changes that equation completely.
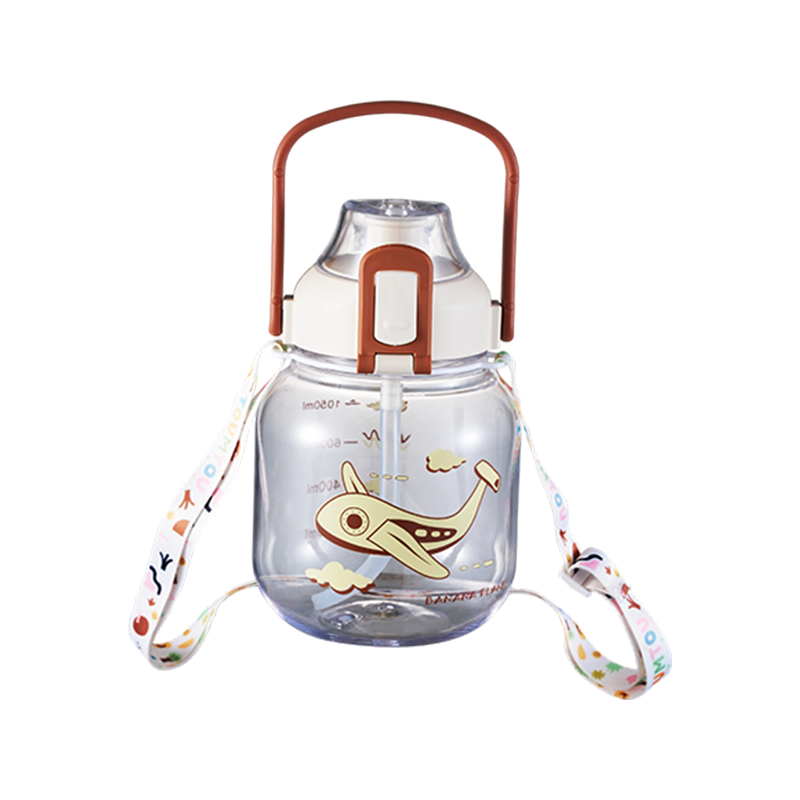
Underneath that mouthpiece sits a narrow tube, a series of tight bends, and small gaps around the connection points where the straw meets the lid. Liquid moves through all of that every time someone takes a sip, and unless each section gets separated and cleaned individually, residue settles into spots a quick rinse never touches.
| Bottle Area | Why It Needs Attention |
|---|---|
| Bottle body | Collects drink residue along the sides and bottom |
| Straw | Carries liquid through its entire length, inside and out |
| Mouthpiece | Gets touched by the mouth every single use |
| Lid | Traps moisture underneath, even when the top looks dry |
| Sealing areas | Small gaps where liquid pools without a clear exit |
A reusable bottle with a straw attachment isn't harder to clean because the design is flawed — it just requires treating it as several small parts instead of one solid object.
Getting the Bottle Ready Before Any Actual Washing Starts
Skipping straight to scrubbing usually means missing something. A little preparation first makes the whole process faster and more thorough.
Start by dumping out whatever's left inside, even if it's just a small amount. Topping off a half-finished drink with fresh water and calling it clean just dilutes whatever residue was already sitting there.
From there, pull apart anything designed to come apart — the straw, the mouthpiece, the lid, any sealing ring. If a piece resists and doesn't look like it's meant to separate, stop rather than forcing it.
A basic routine looks like this:
- Empty the bottle completely.
- Take apart every removable piece.
- Rinse off the loose residue first.
- Get warm water and a mild dish soap ready.
- Wash each part on its own, not all together.
Handling pieces separately makes it obvious which one still needs more attention, instead of guessing after everything's already back together.
Washing the Main Bottle Body
This part is usually the easy half. Fill it with warm water, add a small amount of regular dish soap, and use a bottle brush or a soft sponge that can actually reach the bottom.
Work the brush along the base, up the sides, and around the neck where the shape narrows. That narrowing point tends to trap a thin film of residue that's easy to miss if the brush only goes in and out quickly.
Rinse until no soap remains — leftover suds sitting inside a sealed bottle can leave a faint soapy taste behind on the next use. If the opening is too narrow for a standard sponge, a slim bottle brush designed for that shape works better than forcing something too wide through the neck.
For anyone using a straw bottle regularly, this step covers the container itself, but the straw and lid still need their own pass.
Getting the Straw Actually Clean, Not Just Rinsed
The straw is where most of the overlooked buildup happens, since every sip pushes liquid straight through its interior. If it comes out, remove it first and run it under water to knock loose whatever's sitting near the surface.
A narrow, flexible cleaning brush is worth having specifically for this. Push it all the way through the tube rather than just poking at each end and calling it done — residue tends to settle in the middle stretch just as easily as near the openings.
Don't stop at the inside. The outside of the straw, especially right where it connects to the lid, picks up drink residue too, and that spot gets missed constantly because it's not somewhere people naturally think to scrub.
Rinse thoroughly once the brushing is done. If the straw doesn't detach from the lid, follow whatever the product instructions say rather than yanking on it — a straw that's not designed to separate can crack or tear if forced.
A habit worth building: clean the straw sooner rather than later after drinking anything besides plain water. Juice, coffee, or flavored drinks leave behind more noticeable residue than water does, and that residue only gets harder to remove the longer it sits.
The Lid and Mouthpiece Need Their Own Careful Pass
Pull the lid off entirely and wash it apart from the bottle. A bit of dish soap and a soft brush should cover both the top surface and the underside, since the underside is often the part that stays damp longest.
Areas that deserve specific attention:
- The mouthpiece itself, since it touches the mouth directly
- The straw opening where liquid first enters
- The underside of the lid, which traps moisture out of sight
- Any small grooves molded into the lid's structure
- Sealing surfaces where the lid meets the bottle
- The connection point where the straw attaches
A soft brush reaches into narrow grooves better than a sponge can. And it's worth remembering that a lid can look completely dry on top while still holding moisture underneath — that hidden dampness is exactly the kind of thing that leads to odor over time.
For anyone using a bottle where the mouthpiece sees frequent daily contact, this part of the cleaning routine matters just as much as washing the main body, maybe more.
Handling the Smaller Pieces Without Losing Them
Sealing rings and small connector pieces are easy to overlook and just as easy to lose down a drain. Set them aside somewhere visible during cleaning, and wash them separately rather than leaving them stuck to the lid out of convenience.
| Small Part | Cleaning Approach |
|---|---|
| Sealing ring | Wipe around the full surface, not just one side |
| Mouthpiece | Clean both the inside and outside |
| Straw connector | Clear out residue built up at the joint |
| Lid groove | Work a soft brush into the recessed area |
| Small opening | Rinse gently rather than scrubbing hard |
Avoid reaching for anything sharp to scrape at stuck residue. A scratch in plastic doesn't just look bad — it creates a rough surface that catches more residue next time, making future cleaning harder rather than easier.
If a piece won't budge and doesn't look meant to come apart, check the product's care instructions before trying to force it.
Does Warm Water Actually Make a Difference?
Warm water helps loosen residue that's had time to dry or thicken, especially anything sugary from juice or flavored drinks. Paired with a mild dish soap, it handles most routine cleaning without needing anything specialized.
That said, not every plastic handles very hot water well. Excessive heat can warp certain components or affect how well parts fit back together afterward. This matters particularly with polypropylene bottles, since PP plastic is common in reusable containers but individual products can still vary in how much heat they tolerate.
A reasonable middle ground is water that's comfortably warm, not scalding, unless the manufacturer's instructions specifically say otherwise. For residue that's proving stubborn, letting the removable parts soak in warm, soapy water for a while before scrubbing tends to make the job noticeably easier.
Stopping Odors Before They Start
That sour smell inside a bottle doesn't appear out of nowhere — it develops when moisture and drink residue sit undisturbed for a stretch of time. Washing the bottle soon after use is the simplest way to avoid reaching that point in the first place.
After washing:
- Pour out any remaining water completely.
- Give everything one more rinse.
- Leave the lid off instead of sealing it shut.
- Separate the removable parts whenever it's practical to do so.
- Let everything dry fully before reassembling.
Anyone using the bottle for flavored drinks should pay extra attention to the straw and lid specifically, since these hold onto small amounts of liquid even after the main body looks empty and clean.
For daily users, staying ahead of this with regular cleaning is far less work than trying to scrub out an odor that's already set in.
Letting Everything Actually Dry
Drying gets skipped more often than it should, but a bottle sealed up while still damp is exactly how odors and buildup get a head start.
Once everything's rinsed, set the bottle upside down somewhere with decent airflow. Keep the lid and any small parts separate so air reaches all sides, rather than stacking everything back together while still wet.
The straw needs particular attention here — water can stay trapped inside the tube even when the outer surface feels completely dry to the touch. Standing it upright or propping it so both ends can drain helps avoid that trapped moisture.
| Part | Drying Method |
|---|---|
| Bottle | Upside down, opening exposed to air |
| Lid | Kept apart from the bottle itself |
| Straw | Positioned so water drains from both ends |
| Sealing parts | Laid out separately in a clean, dry spot |
Drying each piece on its own makes it much easier to spot if something's still holding moisture before it gets reassembled and used again.
How Often This Actually Needs to Happen
There's no single fixed schedule that works for everyone, since it really comes down to how the bottle gets used day to day. Something filled with plain water and rinsed daily needs less intensive attention than one used for coffee, juice, or protein shakes.
Extra attention is worth giving when:
- A drink has been left sitting inside for a stretch of time.
- An unusual smell starts showing up.
- Visible residue appears anywhere inside.
- The straw feels resistant or difficult to clean through.
- The lid still feels damp after being stored.
The goal isn't following a strict schedule — it's simply not letting residue accumulate to the point where cleaning becomes a bigger job than it needed to be.
Habits Worth Dropping
A few small habits tend to undercut an otherwise reasonable cleaning routine.
Washing only the bottle body while skipping the lid and straw is one of the most common. Both of those parts touch the drink just as directly as the container itself, so leaving them out defeats much of the purpose.
Sealing a bottle shut right after washing is another. That damp, closed environment is exactly the condition that encourages odor and buildup, even after a thorough cleaning.
Worth keeping in mind:
- Don't skip cleaning the inside of the straw.
- Don't let drink residue sit for an extended stretch.
- Don't store the bottle while any part is still wet.
- Don't use anything sharp to scrape at plastic surfaces.
- Don't force apart pieces that resist separating.
- Don't treat a quick rinse as equivalent to actually washing it.
None of these are complicated changes — they're mostly about not skipping steps out of convenience.
Keeping a Straw Bottle Ready Without Much Extra Effort
Once cleaning becomes routine instead of an occasional chore, a reusable bottle stays far more pleasant to use day after day. Empty out whatever's left, separate the parts built to come apart, wash each piece, rinse away the soap, and leave everything open until it's fully dry.
Before refilling for the next use, a quick glance at the mouthpiece and straw for leftover residue is worth the ten seconds it takes. Making sure everything's reassembled correctly beforehand avoids a leak or a loose piece later in the day.
This same approach works whether the bottle is polypropylene or another type of reusable plastic — the specific care instructions from the manufacturer should always take priority, especially with designs that include specialized or unusual removable parts. Giving regular attention to the body, straw, lid, and small connecting pieces keeps the whole system genuinely ready for daily use, rather than something that quietly turns into a maintenance problem down the line.
Related Products
We specialize in the production and sales of plastic water cups, and also provide customization services
and comprehensive after-sales support.
QUICK LINKS
CONTACT US
- Address:No. 1 Shuangyou Road, Nancheng Street, Huangyan District, Taishan City, Zhejiang Province
- Tel: +86-19957687783
- Email: [email protected]
- Whatsapp: +86-19957687783
MOBILE
Copyright © Taizhou Huangyan Zuohao Plastic Factory.
All Rights Reserved.
